3 Simple Ways to Texture Miniature Bases for Wargaming
In this article we will show three different ways to create natural looking textures for your wargame miniature bases. Look out for the bonus tips too!
Contents
There are as many different techniques for decorating the base of a wargame miniature as there are to paint the miniature itself. Advanced modellers and display painters may well put as much time into the base as the model and create amazing scenes with it.
For most of us though, we just want to quickly and easily get a nice texture down. If one has dozens or even hundreds of models that need to be tabletop ready, then it pays to keep it simple.
Here follows three different ways to turn plain plastic bases into plausibly natural terrain, simply and cheaply. Following after that, do not miss the bonus basing tips!
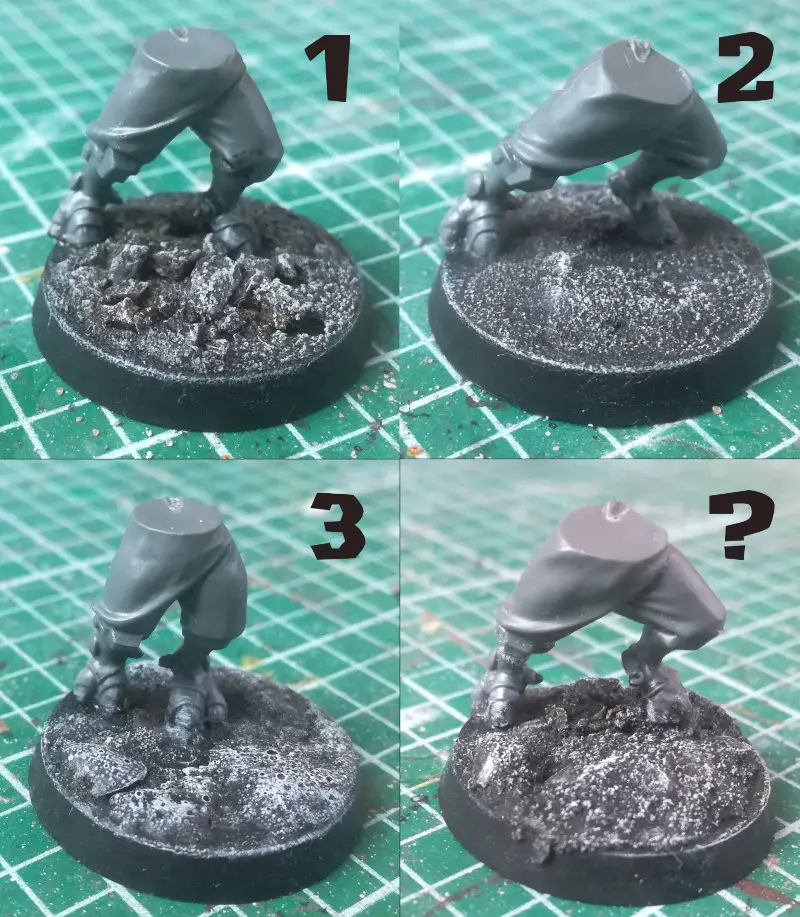
1. PVA and Sand
Advantages and Disadvantages
This technique is probably the oldest of them all. All the materials for this method are cheap and easy to source. There is virtually no risk of injury because PVA does not stick well to skin and has low toxicity.
Depending on the size and variety of particles a wide range of different effects can be achieved from fine dust to rocky ground.
Required Materials
All you need is PVA glue, sand, water, one small container, one large container and an applicator. PVA is short for Polyvinyl Acetate.
The applicator can be an old ruined brush, unfolded paperclip or cocktail stick. The PVA bottle itself may include a brush applicator depending on the brand. You may find a cocktail stick works better anyway.
The large container should be about the size of a ice cream tub. The small container can be about the size of a shot glass though more shallow. Your household waste should provide both. The plastic blisters that package some miniatures work well here too.
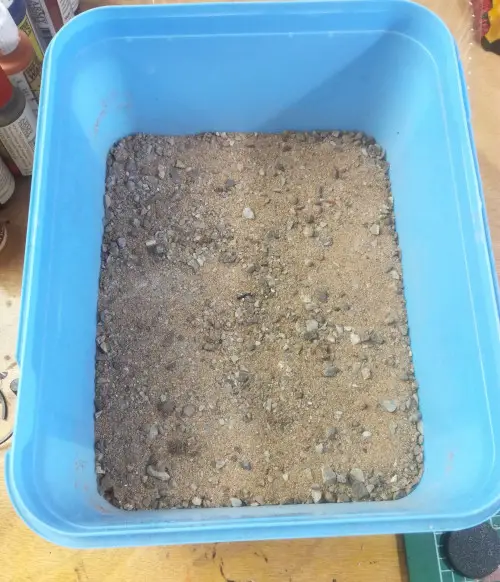
The large container will contain your sand mix. The small container is used for mixing water with PVA.
Method
Step One: Apply Layer of Neat PVA to Base Surface
Using an applicator apply a layer of neat PVA over the surface of the base. If the model is already secured to the base be careful to avoid getting any PVA onto the model itself. Or else if some PVA does get on the model then remove as much as possible using the corner of a paper towel, a wet brush or a cotton tipped swab.
To apply the texture before sticking the model to the base you can mask where the feet will join with the base with an removable adhesive putty like Blu-tack. See bonus tip Putty Masking Feet Placement.
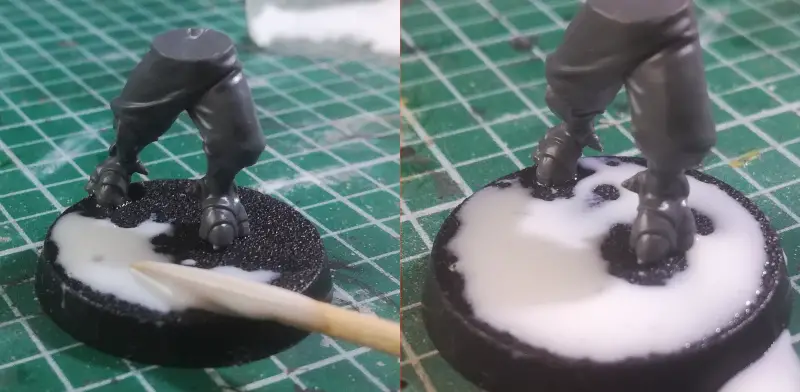
Step Two: Apply Sand
Dip the base into the sand mix, before the PVA layer dries. Then shake off the loose excess, being sure to catch the loose sand into your sand container. You may also want to remove or rearrange any larger pieces of grit or gravel that sticks. Leave to dry for at least a few minutes.

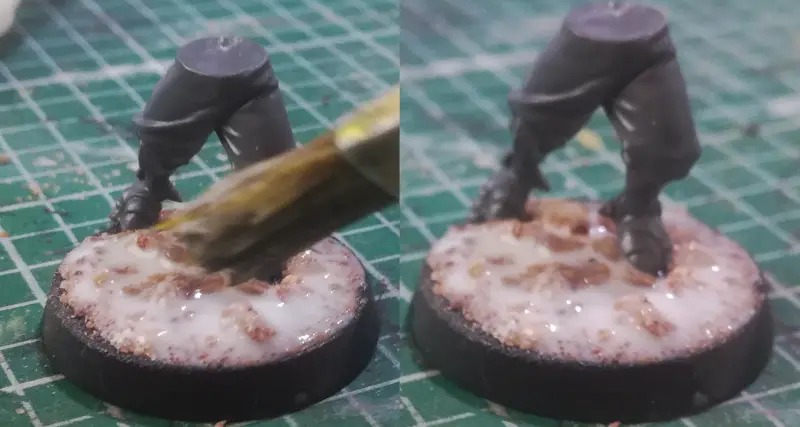
Step Three: Seal with Dilute PVA
In your small container mix a small amount of PVA with water until it is fairly runny. Then paint this diluted PVA over the sand.
When this layer dries it will help to keep the sand secure. It will also smooth out some of the excess roughness of the sand. This will make painting easier and less harsh on the brush used as well as save on paint.
For this step a brush works best as an applicator. Be sure to thoroughly wash the brush in warm water afterwards to avoid the bristles bonding together.
Step Four: Leave to Cure
It can take as long as 24 hours for PVA to fully set. PVA cures through water evaporation so applying heat and air current from a hair dryer can speed it up.
Notes
PVA creates strong bonds for wood and paper but is poor on plastic. This is not an issue as all the PVA needs to do is hold the sand in place, so it does not need to be a load-bearing bond.
However the weak bond may cause the texture to wear off over time and rough use. The texture will also come off if the model is placed in a paint stripping medium. On the other hand, that the texture can be easily scrapped off is an advantage if one wants to change the texture at a later time.
2. Super Glue, Sand and Bicarbonate of Soda
Advantages and Disadvantages
This method will produce a fast setting texture that is also hard wearing. It has some risk attached to it given the use of super glue. Super glue bonds well with skin and has unpleasant fumes. Take care and use in a well ventilated area. Super glue is generally more expensive than the PVA used in Method 1 above.
Super glue is also known as CA glue. Its proper name is Cyanoacrylate.
Required Materials
The required materials and tools for this method are super glue (thin or gel), sand, bicarbonate of soda. Thin gloves are advisable when handling super glue.
Find bicarbonate of soda on ebay.
Method
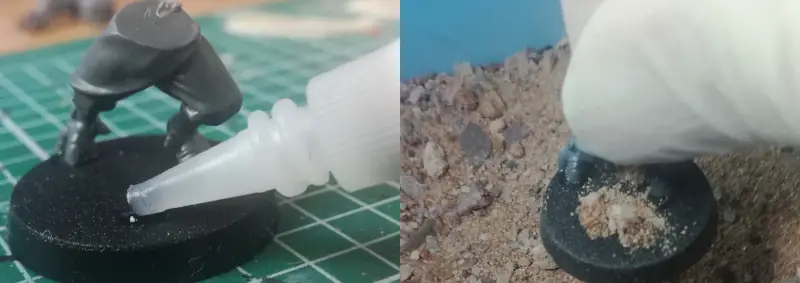
Step One: Apply Sand (Optional)
The Bicarbonate of Soda by itself will make a fine but rather flat texture. To give the final surface a more undulating appearance we can apply some sand before the Bicarbonate of Soda.
Apply some super glue in small patches on the base. Then promptly sprinkle some sand mix over the glue. Shake off the excess sand and catch in a suitable container.
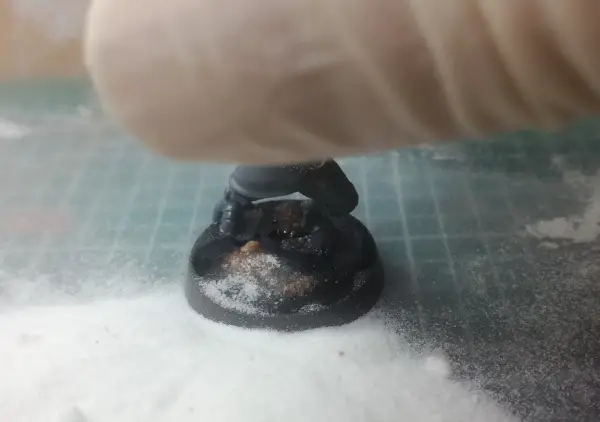
Step Two: Apply Bicarbonate of Soda
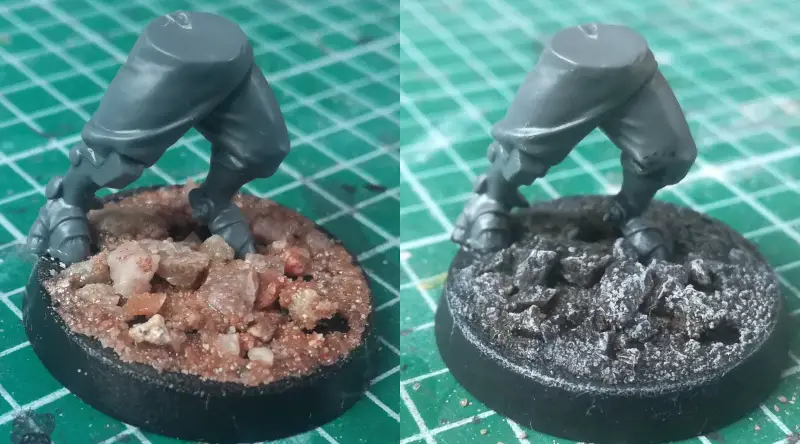
Apply a layer of super glue over the whole base surface including the sand. Then promptly sprinkling a fine layer of bicarbonate of soda over the whole base catching the excess in a suitable container. The bicarbonate of soda will react to the super glue, rapidly hardening the super glue. At the same time the powder creates a very fine texture over the base.
Step Three: Brush off Excess
The bicarbonate of soda and super glue forms a fast setting cement but a thin layer of unreacted bicarbonate of soda may remain over it. This will be loose and interfere with paint applied over it and should be removed with a stiff brush. The super glue and bicarbonate cement dries clear so unreacted bicarbonate can be identified because it remains white.
Now it is ready for painting.

Notes
This method works best with thin super glue as it will cover the base more easily. However thin superglue is more likely to run off the base and onto hands or other places where it is not wanted. Extra care should be taken when using thin super glue.
3. Gorilla Glue
Advantages and Disadvantages
The original Gorilla Glue is a kind of superglue with some interesting properties. Like superglue it cures in the presence of water but unlike superglue it will expand as it cures to fill gaps. It is this property we can use to create an undulating texture. The resulting texture is quite smooth and bubbly which is potentially a nice effect for volcanic rock, strange or alien terrain.
Gorilla Glue bonds as strong as super glue but takes much longer to cure. For this reason it is safer to use than super glue.
Required Materials
All that is required for this method is the original Gorilla Glue, a cocktail stick, a paper towel and water.
The company that makes Gorilla Glue also makes regular super glue under the same branding. You can distinguish between them by the fact that the original Gorilla Glue is brown.
Method
Step One: Dampen Base Surface

Wet a paper towel with water and dab on the surface of the base, while being sure to keep clear of the model. Gorilla Glue will expand as it cures proportionately to the amount of water with which it is in contact. Consequently natural undulations can be created by varying the wetness of areas of the base.
Step Two: Apply Layer of Gorilla Glue
Gorilla Glue is quite thick. Apply a blob to the surface of the base then spread as thinly as possible using a cocktail stick or similar disposable implement.
As with the PVA method above, take care to avoid getting any of the glue on the miniature. If some of the glue gets where it is not wanted it is best to remove it with a dry implement such as a paper towel. PVA dissolves in water but Gorilla Glue is cured by it.
Step Three: Allow to Cure
Gorilla Glue takes a couple of hours to fully cure, unlike super glue. When cured the Gorilla Glue will form a hard, creamy off-white bubbly surface.
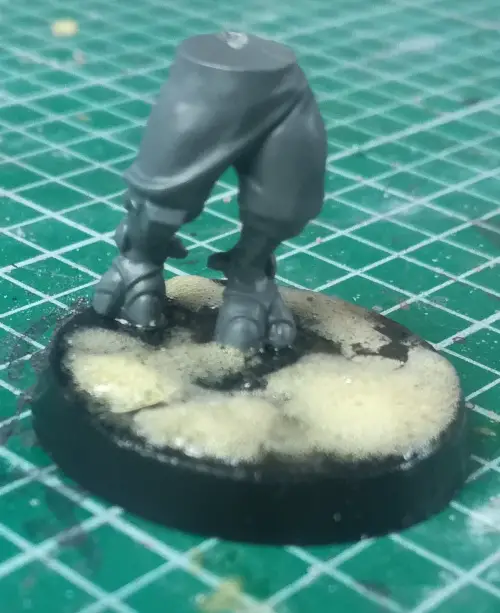
Once the Gorilla Glue is cured it is ready for painting. The picture below shows how the texture looks after drybrushing white over black primer.

Bonus Tips!
Source and Prepare Sand for Basing
DIY and hardware stores will usually stock builder’s sand. A single bag will provide a lifetimes supply of hobby materials for a trivial price. Such bags of sand may come in a variety of grades and granularity. A mixed grade is best for our purposes. If desired the various grades can be separated out using a range of sieves.
This sand will usually be quite wet or damp. Before using it for basing be sure to thoroughly dry it.
Depending on your local climate sand may be readily available in your local environment. Sand obtained in the wild like this will likely contain biological components like fungus and mold spores. Be sure to sterilise this sand before use to prevent any growths activated by water.
You can sterilise the sand by placing it in an pre-heated oven for more than 20 mins at a temperature at least in substantial excess of the boiling point of water. This will also dry your sand too.
Tweak Elevations
Natural ground is rarely very flat. The above methods by themselves add a natural texture but do not change the leveling of the base or model much.
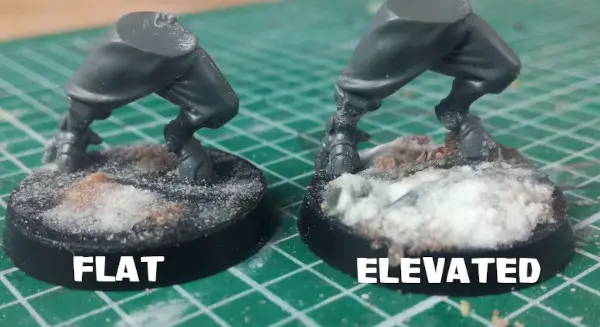
To introduce an extra layer of natural undulation we can do two things:
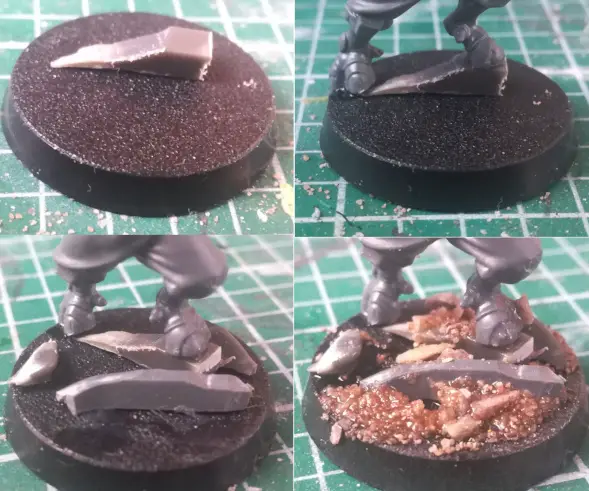
Base Undulation
Before applying our texture we can glue or cement scrap plastic and other materials to the surface of the base. Then after the texture layer is applied over it a rough and uneven surface emerges. Small amounts of modelling putty or filler can also be used for this.
Model Tilt
If the model’s feet or wheels are stuck directly to the base then the flatness of the base will carry over to the model. However it is not usual on rough natural ground to be able to stand perfectly level.
We can break this up by attaching the model to the base so that it is tilted slightly. It should be a slight tilt because most models are sculpted with the assumption that they will based on level ground. If we introduce too much tilt then the pose will look strange and gravity defying.
A tilt can be achieved for “slotta” miniatures simply by leaving one side of the tab slightly raised from the base. Fill the gap underneath the foot with scrap material as described in Base Undulation.
Otherwise a tilt can be achieved by gluing or cementing something in between one or more feet and the base.
Position the Model to Minimise Overhang
It is always tempting to glue the model onto the centre of the base. However depending on how the model’s limbs and armaments are arranged that can result in those limbs and armaments overhanging the base. Often it makes sense to position the model off centre to minimise overhang.
Putty Masking Feet Placement
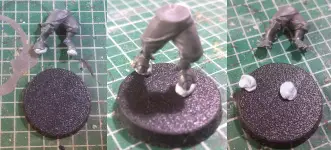
Whether the model is plastic, resin or metal it will make a much stronger join to the original base surface rather than to the texture applied on it. So for those who like to paint their miniatures separately from the bases we can mask where the feet will go before applying the texture.
To do this, apply a removable putty like Blu Tack to the feet of the miniature. Then stick the miniature to where one wants it to stand on the base. Finally remove the miniature leaving the putty in place on the base.
Which methods for creating a basing texture do you like?
Share this article to my twitter @SolarCrossGames or my reddit community r/SolarCrossGames and let’s chat about it.
Learn more about the wargaming hobby by clicking here.
